|
Sound And Torsion
|
||
|
|
There are a few approaches to
speaker systems, (the current preoccupation here) and it's worth noting
that dual-concentrics are only one. But if you're set on something like
a single-source, full-frequency driver that need not compromise... or
can't see trying to blend a stew of differing driver components, the
Tannoy Monitor Gold dual-concentric is a reasonable starting point.
In all honesty, I'd rather be
talking about esoteric phono cartridges and tube amplifiers, but you
do need speakers. And, you need amplifiers to drive those speakers.
Which should come first ?
Well, on the evidence of
listening for half a century almost, I'd modestly propose that ---
counterintuitively, and it didn't seem so to me at first, but--- the
amp is the more "diva" component. Once you have an amplifier type
with finite power and a given sound signature, it excludes a number of
speaker-system types immediately. At least that's how it appears to me
these days. In the early days I'd always gone with the idea of the
speaker as the voice of the system, consequently the first choice to be
made. It made sense that the voice of the system should be catered to,
in the later choice of the amplification.
That was when the general
premise was that the amp would be solidstate, possibly separately
biamped, and endless watts simply a matter of running up the credit card
a little bit further. And as it stands now, most of the world has
lowered its standards to that steely, bleached solidstate sound. All
theoretically in the interest of sonic cleanliness and reduced
distortion. But like wheat-free muffins or decaf coffee, that reductive
approach ends with an unsatisfying compromise -- in this case a lifeless
or reanimated aspect to the sound. To my ear anyway.
We don't need to settle for all
that, or take the ambiguous deal with the devil that offers thundering
THX style body-blows, laserbeam high frequencies, and leaves the life
and the heart out of the music.
This isn't ice-hockey or
extreme wilderness adventuring-- it's a bit more subtle than
that. Vacuum tubes offer a viable alternative, and one that hasn't
got subliminal dissonances in its harmonics. Likewise, that
familiar need to keep turning up the volume (with solidstate) disappears
magically with good, small-scale tube amplification. The amplifier
that renders a full-harmonic picture of the original recording ---
(ruling out super-exotica highend solidstate).. is often enough a
medium-to-low-powered vacuum tube unit. Of which there are many
families and sound categories to explore. Simple enough, really, and
just to be historically accurate, vacuum-tubed transformer-coupled amps
are the original instrument that once powered all loudspeakers.
So as is often the case in
system-building architecture, the least cooperative element dictates the
terms to the rest of the chain. If it is a case of low-wattage
vacuumtube amplification providing the least common denominator, or the
lesser offender of all error-prone contestants, the interested user can
do much worse than to consider a Dual Concentric driver. Tannoy alnico
monitors are a well-designed and efficient solution to the speaker part
of the equation. The Tannoys were designed in the tube era, and suit
that kind of amp very well.
All that's left is to house
those Tannoy drivers in appropriate enclosures, and that's where this
project picks up. Along with cabling, stands, spikes, binding-posts,
crossover components, construction, bracing, fiber-fill, finishes, and
all the other countless considerations.
Here goes.
Build-Blog
The entries here feature
the most-recent on top.
If you want to
read in sequence, scroll down and select the earliest,
February
2010 post, and begin there (just the way this template works).
Saturday, September 3, 2011 Only Seventy Five Hours
The run-in period
here involves almost the whole signal-chain from the poweramp
outwards : the kimber 8tc cabling with newly terminated,
replaced postmaster spades, the cardas binding posts, all the new
elements on the crossover boards, and the many newly-made solder
connections. So 75 hours probably isn't time enough to tell.
We've been thru
all the well known phases: the initial, coarsely blunt sound, that
refines and refines till it's gone too far toward detail and
brilliance (of the annoying kind) ... Then the few false
'settle-down' periods, where it will fall back to the middle but
then goes off again on some other peaky or tilty drift ...
At this mid-point
it's finally sounding really good but with one distinct drawback.
Recordings that are known to be excellent are rendered in all-new
3-D technicolor, while recordings known to be so-so are sounding
blah. This is the worst kind of performance, really, because it
tempts you to play program material that is pretty flawless
sonically, immune to the increased scrutiny of all that new-found
focus and detail ... Rather than choosing material for musical
quality.
I'm a firm
believer that it should be entirely the other way around, with
performance that gives it's best with middle-of-the-road quality
recordings, only sounding a touch worse with poor ones and still
sounding very good with much better ones. If your system promotes
or incentivizes the choice of audiophile-quality recordings, your
mind and soul may be at risk.
Half the most
inspiring music ever recorded was done in a slapdash fashion, either
due to cluelessness or neglect, but it can't be denied on "sonic"
grounds. You should be able to feel your soul thrill to the high &
lonesome thrum of an early Louis Armstrong horn solo, in spite of
it's origins on non-audiophile mono recordings.
Part of the allure
of the Tannoy driver system is it's effortlessly coherent yet
forgivingly warm sound. Let's keep that as the goal and never get
audiophile with this.
It is likely this
all middles itself out, with a bit of oxidation and time, to a
softer, more graceful but still dimensional sound. An
older-but-wiser version of it's present self. That's generally the
way it works-- newly-constructed generally equates with
overly-detailed, which favors faultless recordings, where there's
nothing to notice that's off. Once things have settled a bit, like
a new car after a couple months of steady use, the sharp edges
are rounded away and the real character of the thing is a little
more honestly apparent.
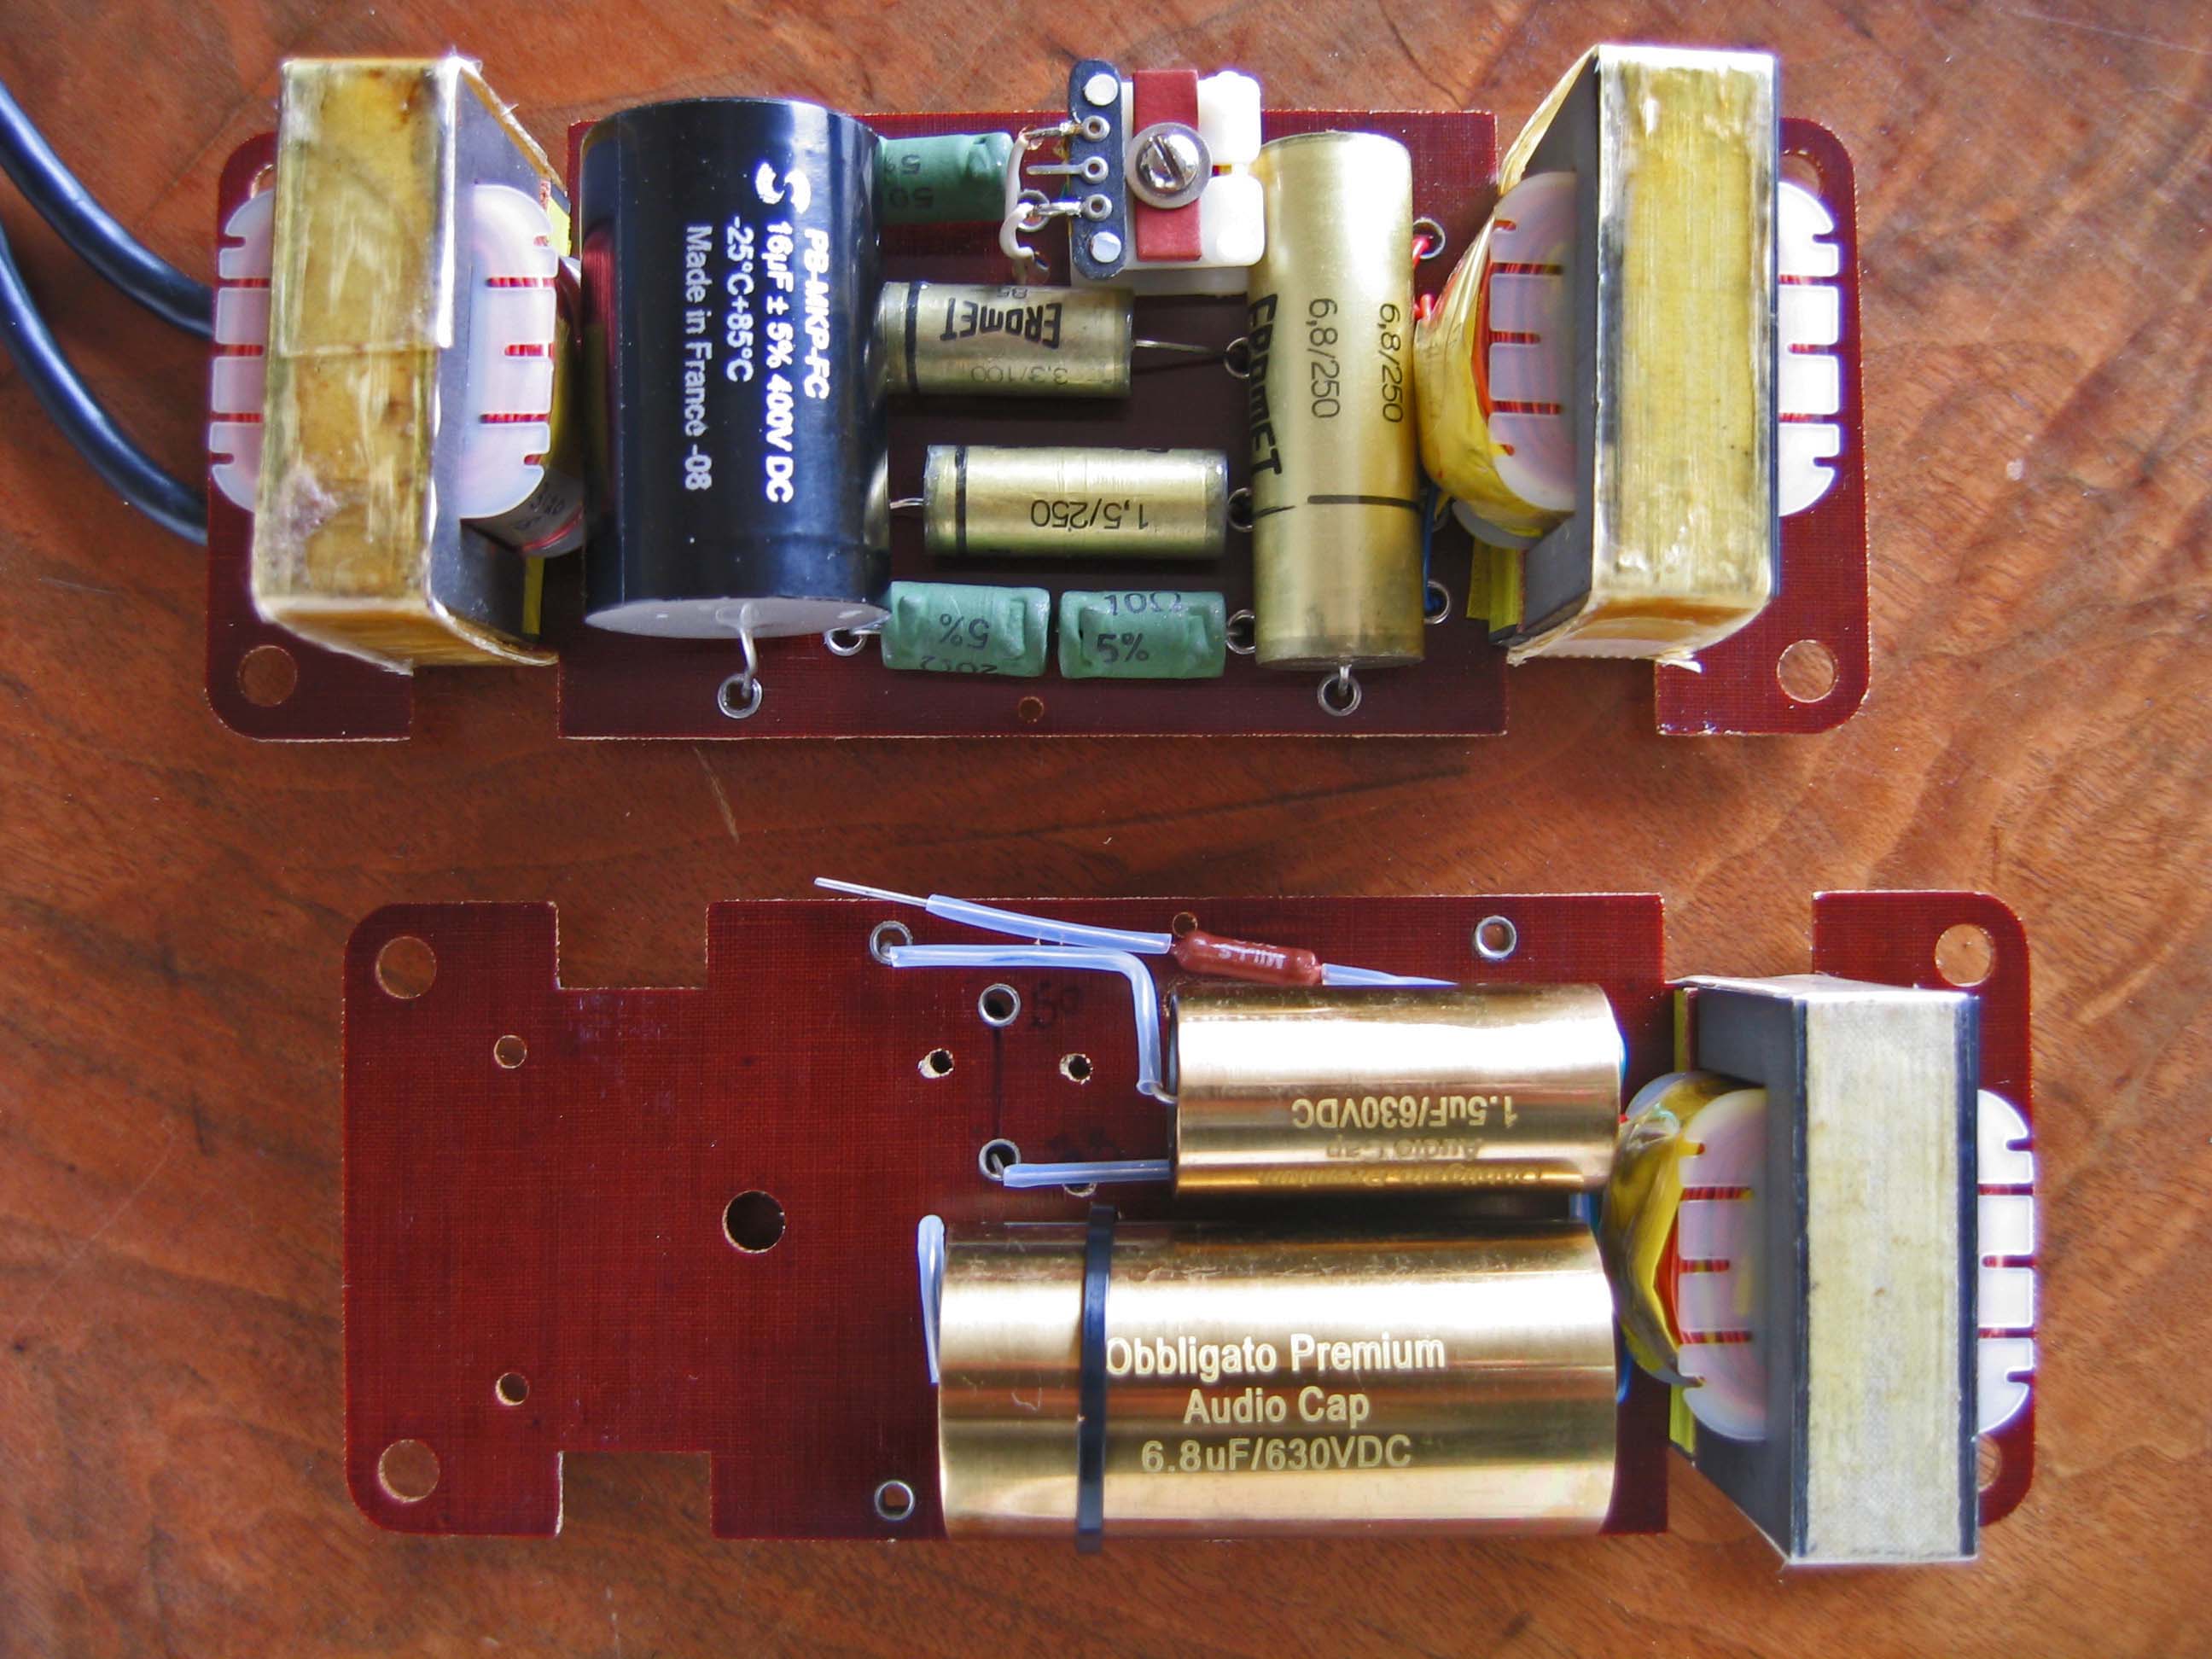
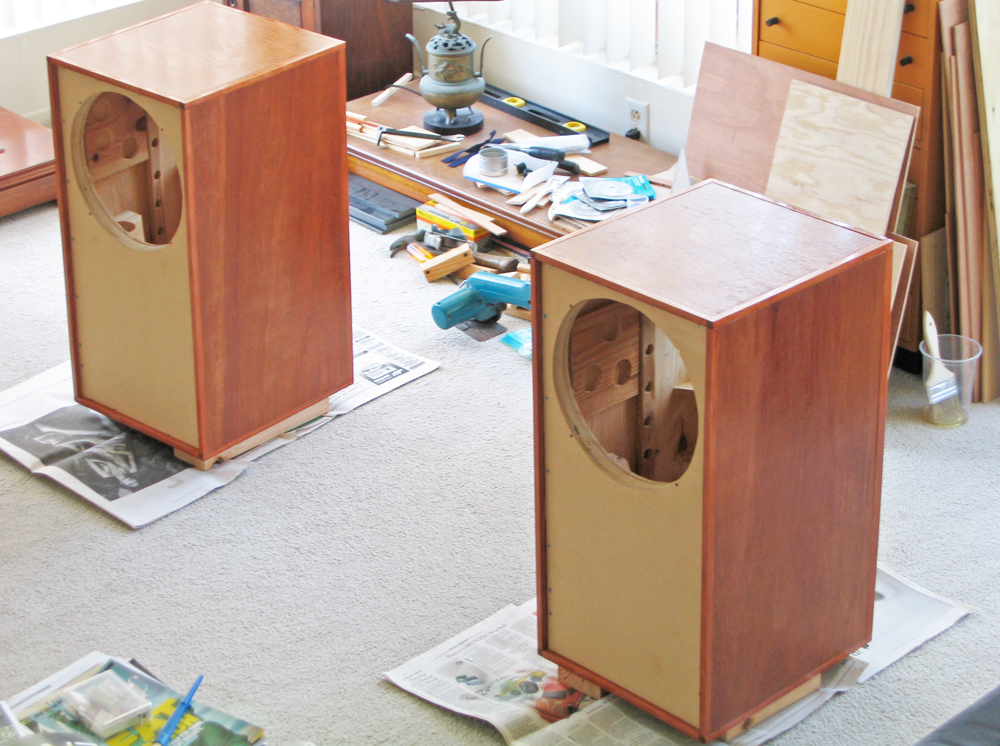
4:55 pm pdt Tuesday, August 30, 2011 New Crossovers In Operation
Burning in
newly-constructed crossover boards, new photos at right.
Took about three
challenging weeks to redesign positioning aspects, but then just a
couple days to do the actual reconstruction. Shifting a 70's
terminal-board setup with small industrial parts to present-day 3D
approach with large audiophile parts was a lot to consider for the
first time.
Crossover
components are now working in closer proximity, and from both sides
of the board; small wood enclosures have been built and fitted to
backs of speaker cabinets to contain larger unit size. Crossover
units are still physically external to the speaker cabs, but mounted
piggy-back to lessen cabling.
Signal path has
been shortened, unused terminals and jumper leads have been
hardwired or eliminated. New high-current connections are a cleaner
fit, and the physical mounts for components are way more luxurious.
(I did leave in place a short set of leads on the small #3121
inductors, as a precaution for hum, as in the ability to rotate or
tweak ... but no worries there, so next time those leads will be
eliminated too...) Solens are running the lowpass duties, and
Obbligato Golds comprise the high-pass arrangement; new Mills
wirewound resistors have replaced three series-connected originals
with two combined-value units. And the original Tannoy
stock autoformers & inductors remain.
Every effort has
been extended toward keeping to the exact values of the original
Tannoy circuit. As a small gesture toward voicing, though, I
cushioned the Highpass parts with 1/8" silicone closed-cell foam (as
used in outdoor electrical boxes for gasketing) and strapped
securely with nylon cable ties. The Lowpass parts were mounted
direct against the boards with no compliant bedding. This
arrangement seems likely to me to moderate Treble and soften the
highs a tiny bit, while leaving Bass as is, an adjustment to be
validated by listening. I'm very familiar with the previous sound
of these drivers and cabinets, so have some expectation of making a
reasonable judgement by ear. We'll see if this works as planned
... After about a hundred hours or more of burn-in.
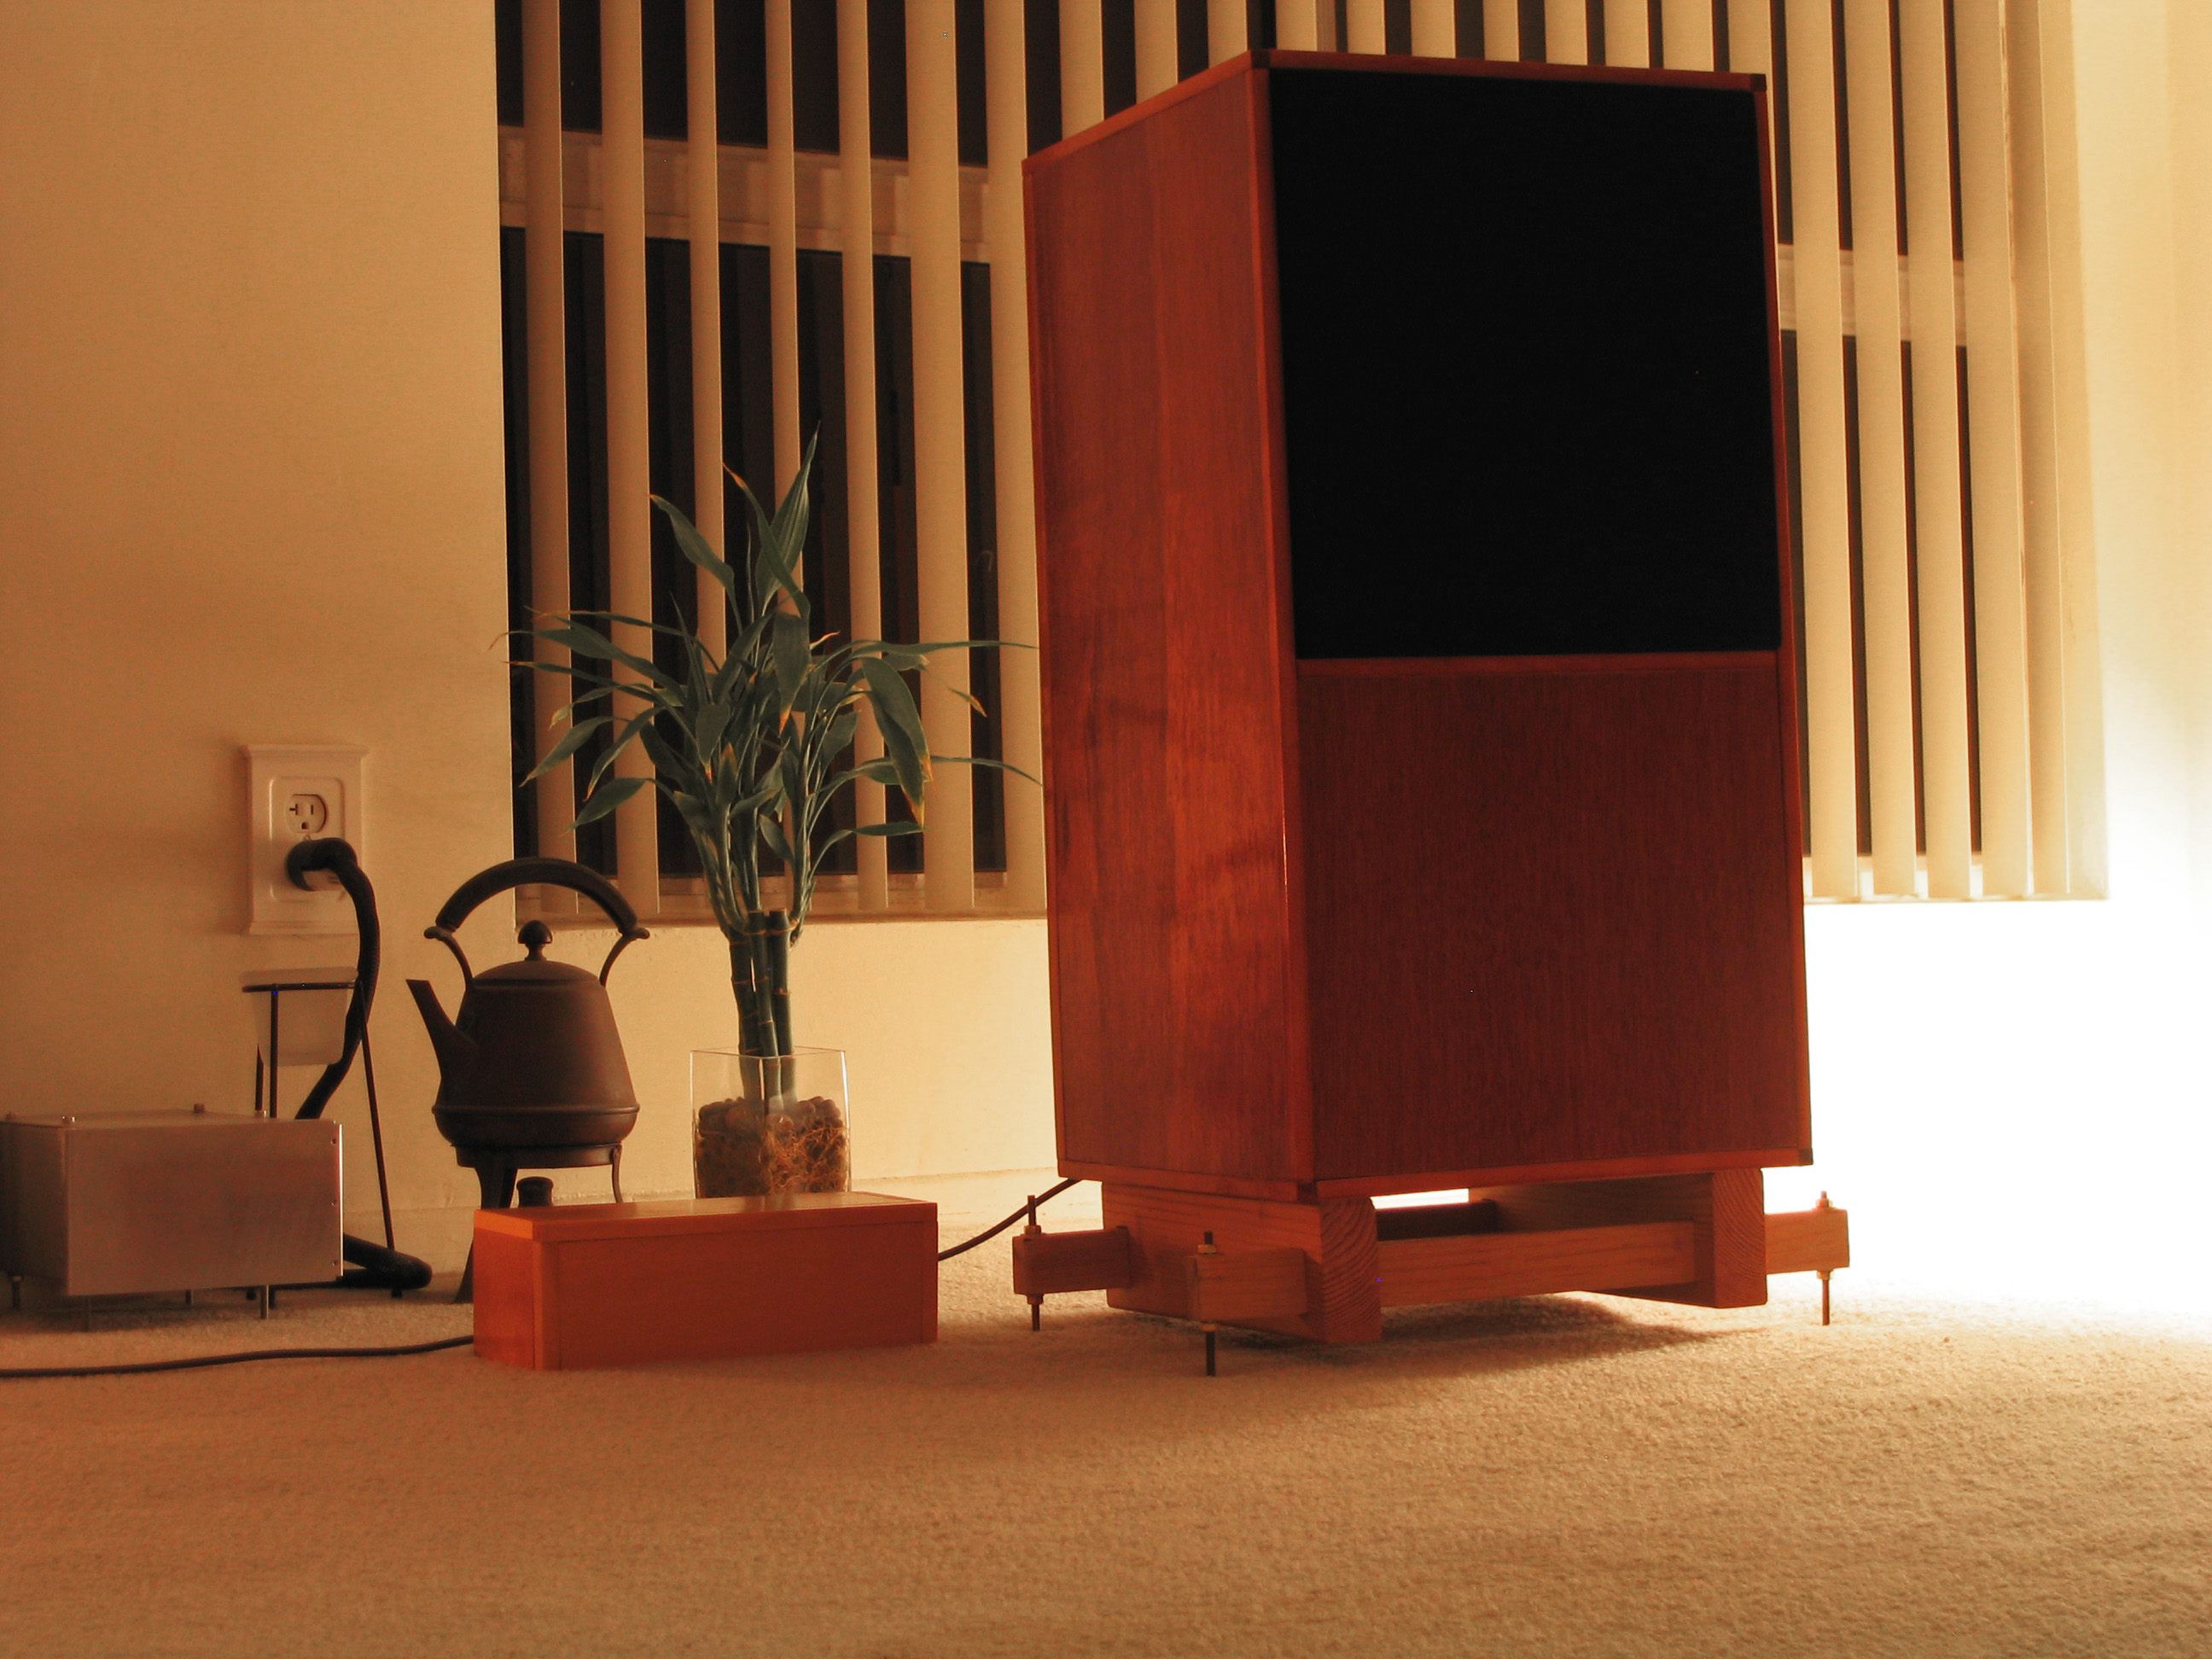
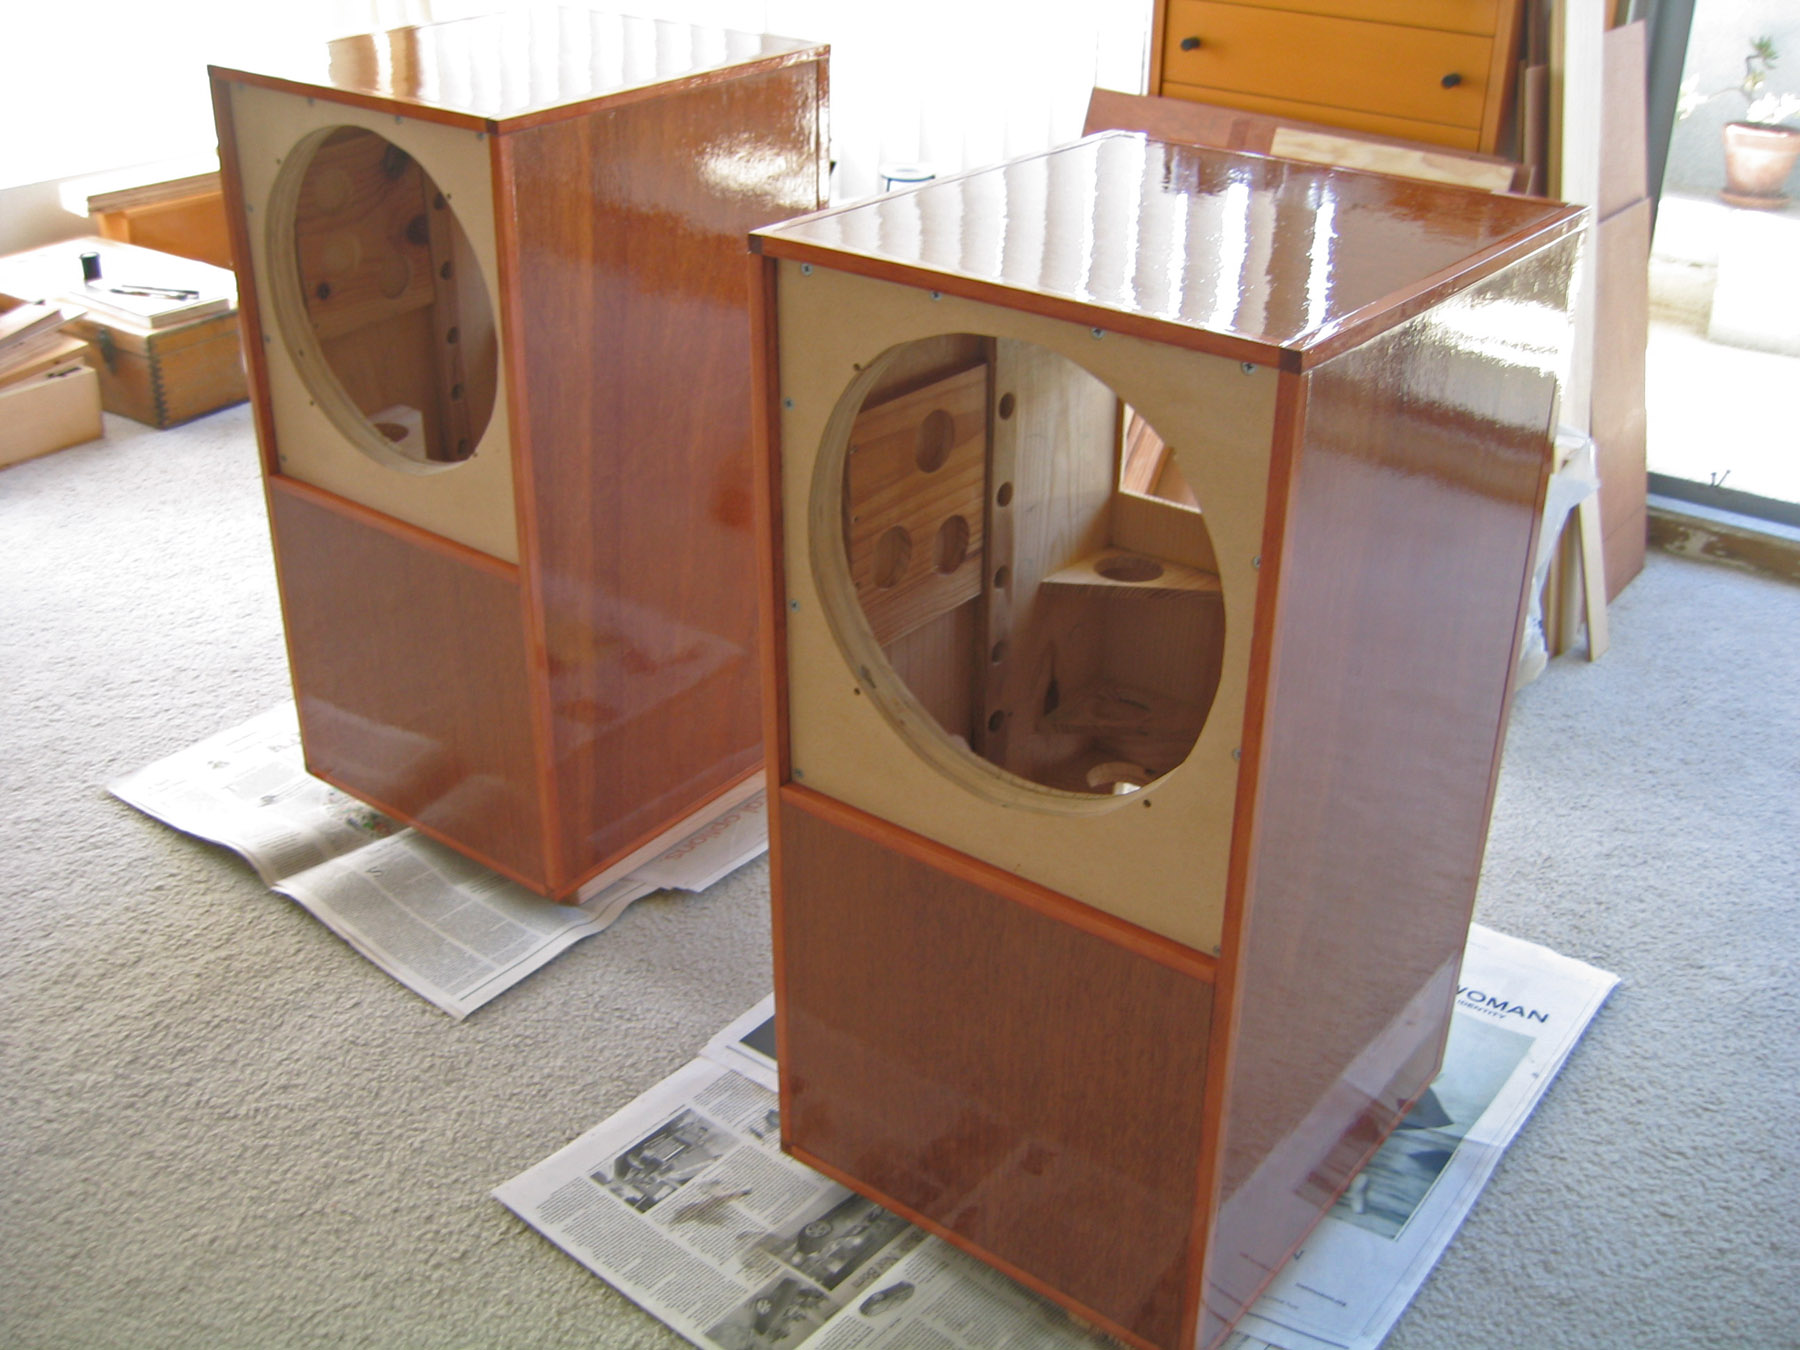
Tuesday, July 12, 2011 Cabinet Extension In Progress
Spring-summer
project: Photo has left-hand speaker upside down to show perfed
areas. Newly added, some extension to cabinet backs, perforated
previous back panels within. Also perfed bottom panels, which will
get another layer of ply to form new base.
These changes
shift the interior reflective surfaces again, making a more
labyrinthine chamber to disperse direct reflection and standing
waves. Also adds some valuable extra volume to deepen tone
overall. As noted below, once I got the Tannoys up on their stands,
I noticed that the bottoms were more resonant than they should be;
sitting against the carpetted floor this hadn't been noticeable.
In a more
elaborate rendition, I would have done at least the backs as torsion
panels, but in order to get this on the road I just added backs of
3/4 inch baltic birch, which seems to suit the bill (and takes quite
a bit less time, to be honest). The base panels are fine as a
composited perf panel clamped & glued to another non-perfed ply
panel, very rigid and non-resonant. Each little adjustment,
whether complex or minor, seems to add to the depth and solidity of
the sound image. So far, so good.
Now crossover
again, enclosures for same, new cable, binding posts, and
beyond......
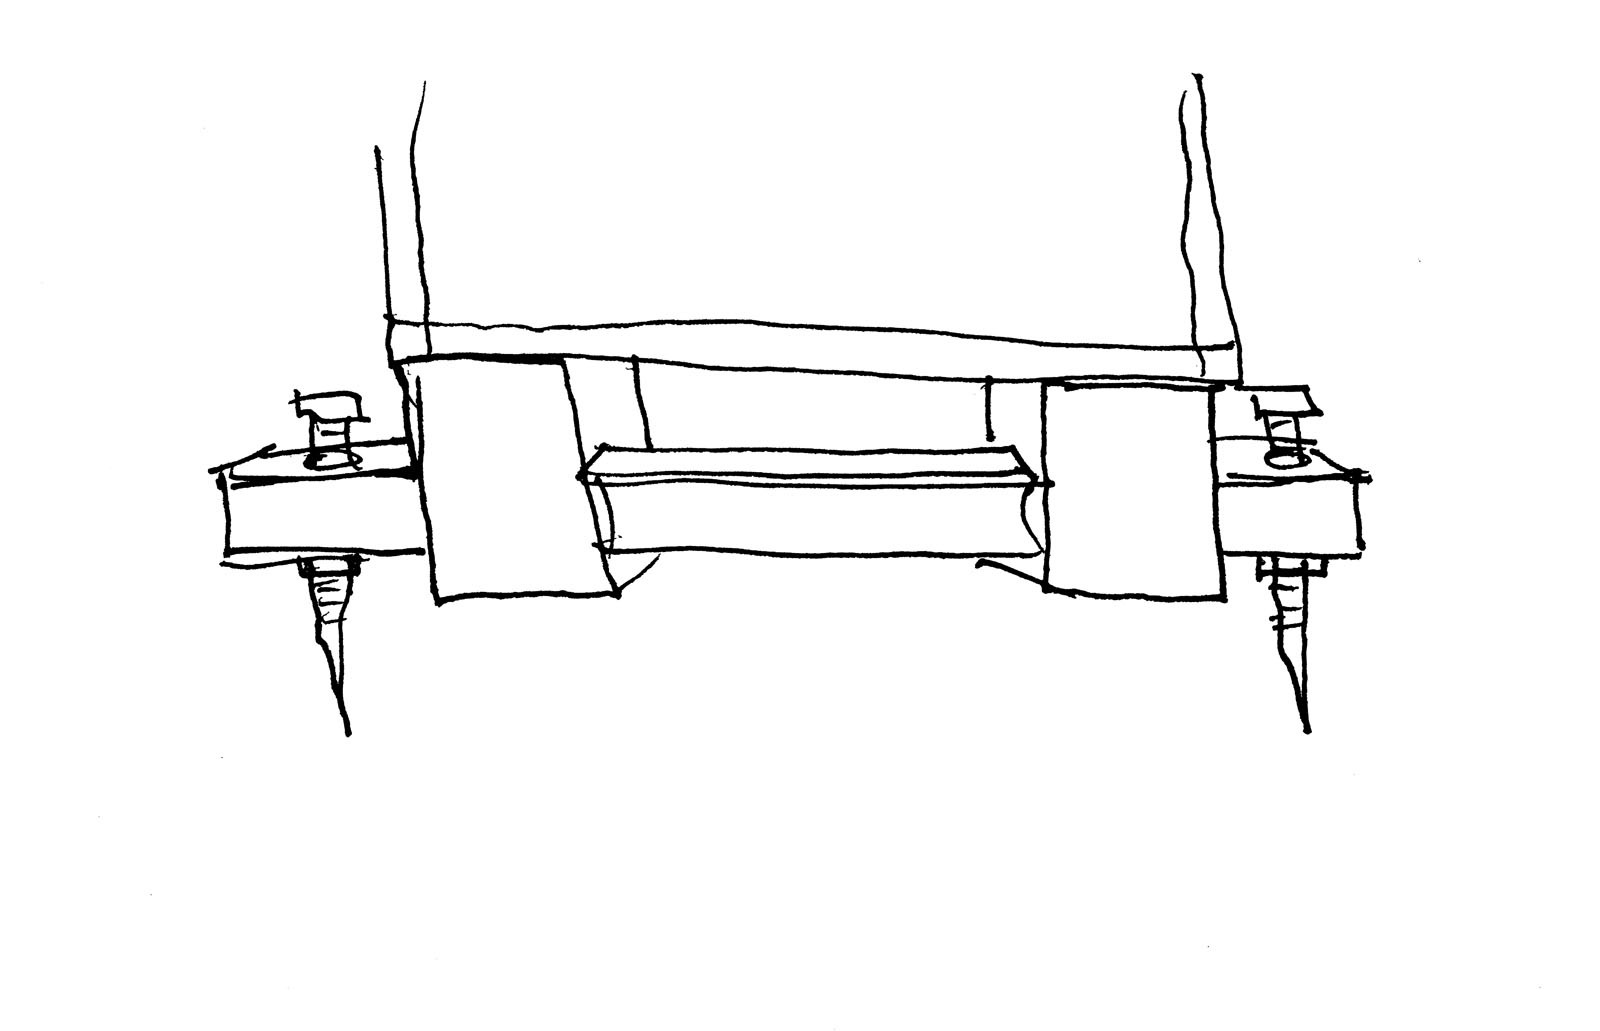
1:53 pm pdt Saturday, March 19, 2011 Some Adjustments
Dismantled the cabinets and
shelved the Tannoys for the moment, in the interest of doing a few
long-wished-for improvements. The end of the week was spent boring
out mass-relief holes in the internal structure of the cabs and
doing the same to the single-layer bases, which will now become
double-layered, holes to the inside, clamped and glued. This
will add a few more cubic inches to the interior of the enclosures,
while lowering resonance tendencies of the base panels, only
apparent since the cabs have gone up on their risers. In general
another layer at the base will increase rigidity & stability.
At the same time I'm
refitting the Tannoy Crossover units to accept Cardas binding posts,
eliminating the relatively thin Tannoy speaker leads. Cabling from
amp to crossover will now be a length of Kimber 8tc cable, which
should be something of a clear improvement. Before we move on,
thought, it should be said that if you use that thin Tannoy lead
bare-ended, straight into your amps outputs, you could do a lot
worse. Pre-highend cable-think though it may be, at a short
distance it's fairly good quality. And it's free with the
crossover, so why not start out using it. (Do cut back a few inches
to get beyond the oxidation layer and start with freshly tinned bare
ends.)
The crossovers will now be
mounted to the cabinets themselves, on the outsides near the base at
the back. What's left in this department is to ponder the four-pin
Tannoy plugs on cross-to-driver leads, which I've elected to keep.
There is too much uncertainty in all of this to hardwire there and
remove the 'modular' ease of setup with the plug / play arrangement
that Tannoy had in mind. After all, tommorrow I might find a pair
of Westminster cabinets on the doorstep; it would be nice to be
able to quickly remove and re-install my drivers in a new cabinet.
(Unlikely as that is, I've found that the versatility with the
plugging helps enormously, with even a short round of improving the
existing cabs, so no hardwire there. Yet.)
The cross-to-driver leads
themselves, though, as terminated in the plugs -- hmm. Those are
also that thin and limited original Tannoy wiring, and just kind of
beg for replacement. But the Kimber 8 is probably too stiff and
difficult to route for that application... Maybe the best fix is
to search out another set of the Tannoy 4-pin plugs, and then
re-wire with something a bit more supple & flexible than the Kimber
...
For this rendition of the
Tannoys, though, it will be the full-freq Kimber braid from amp to
Cardas posts on crossover, and then a shortened-by-half length of
the original Tannoy lead from there to the driver. With the
switches and wiring for tone control adjustments already gone, this
should be a lean, clean, short-path arrangement.
Well, for now, anyway, it's
all about expanding (by a little), mass-relieving, and then
stiffening with extra layers for the cabinet floor. A happy
coincidence is that the crossover enclosures I've rescued from
another project, made of layered woods just like the Torsion Boxes
themselves -- are going to stiffen the lower backs of the cabs just
by virtue of mounting them directly onboard there.
It appears that once you've
got some kind of relatively solid enclosures to work on, there is no
end to the little "tailoring" adjustments you can make, some of
which may even assist in a couple of fields all at once. Some of
which open further issues that will need solving. Hopefully these
are all undertaken with a keen eye to the usefulness per effort
involved, and with some critical listening informing the choices.
Photos when I get somewhere with this round of projects.
11:49 am pst Thursday, November 25, 2010 No Brace No Bracket, No Nail No Screw No Glue
The old Japanese carpenters
believed in using the structure of the wood itself, in a myriad of
ingenious configurations, to interlock and form the vital skeletal
structure of their project.
The Master would spend his
days drawing plans, sections and elevations; his assistant would
choose and mark out the correct lumber for the journeymen to cut and
fit. A section of wood would be deemed suitable for a specific role
according to many aspects. Grain structure and direction,
physical orientation of the tree to the sun and prevailing winds,
even where it stood on the mountain... All of which came into play
when sizing up timber for, say, a 22-foot roof beam that was
expected to traverse most of that length with supports only at the
ends.
Nails and screws,
bolts, various kinds of bracing and plates were available, but
looked upon as last-resort kinds of fixes. The structure was meant
to be held in place by its own internal logic, the forces
& counterforces of stress, mass, and gravity.
Steel was meant to
cut wood, not intermarry with it. Joints were likely to be Mortise
& Tenon, sometimes pegged or slotted to fit other elements in the
design. The master builders liked a clean edge and yet weren't
afraid of the slight asymmetry that comes from an experienced hand
negotiating the work. Manual is preferred to electric powered. The
story goes that they would look down on sandpaper too-- steel
leaves the edge clean when correctly administered, sandpaper
only blurs the errors and makes the grain furry. High standards.
Our little risers have no
relationship with the master builders of Japanese antiquity, but
they can dream, can't they ? Oak hardwood cross-bars rest in
mortises hand-cut into heavy fir 2x4s. The fit there is tight
enough --yes, without any fasteners or glues--- that it cannot
be easily shifted by hand and must be adjusted with a rubber
mallet. The spikes will be sharpened brass rod, as mentioned
below.
To be a hundred percent
honest, I don't know if this is strong enough to do what it's
intended to do. The spikes will be at the very outer edges of the
crossbars, and there will be no wood touching the floor. Hope the
hardwood of the crossbars is up to the job. We will see.
Oh, and I have learned a
little lesson in cutting the mortises with chisels. When you
misjudge your aim and pop out a heartbreaking little chunk of wood
that was never meant to go anywhere, don't get too upset; find the
chunk, put it in a small jar that you hold till after the major
cutting work is over. Then glue the little chunk right back where
it went before the mistake. Nine out of ten times it's an invisible
error once corrected.
Wednesday, November 24, 2010 Intermission
After too long a pause, I'm
back at the Tannoy Project.
There are two sub-aspects
that have made really extravagant demands on the time-frame of the
overall job. First, the removable grilles, to be seamlessly spun
with a standard mesh fabric covering, and then time-consumingly
tweaked to the occasion via a very closely measured 'interference
fit' ... Meaning that they are hardwood frames just flexible
enough to fit over the outer rim of the Tannoy driver, without
impeding or blocking performance, but strong & rigid enough to stay
attached. Great idea, infinitely fuckaround-ish in
execution. Once done, pretty nice, would'nt have anything less.
Second, the speaker-stands,
or more reasonably, speaker risers, since they only account
for about a five+ inch change in height. I've described the concept
in the entries just below, and there isn't much more to say other
than the astounding fact that the speaker stand itself accounts for
about half the performance value of the speaker. My experience is
that the Stand manages to elevate the performance
substantially, or waste the effort put into the speaker design--
it's the foundation of the speaker design, so obviously, really, an
indispensible component. As the power supply is to the amplifier,
or the antenna to the rf tuner, the speaker stand enables or
disables the capabilities of the speaker transducer. Maybe the
simpler example is the turntable support : get it wrong and there's
no end of contradiction in the playback. Get it right, and there is
a hundred-percent validation of the design strategy.
All that sounds a lot of
unnecessary hype, but I believe that the six months expended on
speaker risers wasn't at all wasted; the results are fairly
self-evident. If you have a look, they are considerably different
than the usual run-of-the-mill disconnected tower mounts. After
a brief interval, more on the speaker riser evolution.
But while on the topic, for
what its worth, my system --and maybe yours--- is intrinsically
based on the ideas of the "Ultra Fi" renaissance, founded by the
likes of Kondo-san, Hiraga-san, Kimura-san, Shindo-san, and of
course Harvey-Rosenberg-San.
To say that the
revanchist Japanese outlook on all things audio has
been influential--- alnico-full-freq-drivers,
direct-heated-triode-amplification, transformer-coupled
amplification, idler-drive LP playback ... would be
a fundamental understatement. None of these is a Japanese
invention, per se, but it was largely down to interest in Japan that
these 'obsolete' technologies survived and continuted to develop.
The west had thrown them away in the headlong rush toward weight,
size and cost reduction.
In that light, the
corollary study of Japanese woodworking and joinery-- disciplines
I can never hope to master, but whose vision is all-enveloping....
have long been a revelation, and a tradition I hope to honor in my
further explorations.
Stay tuned ; konichiwa.
11:26 pm pst
Wednesday, July 28, 2010 Midsummer Update, Finally
Already a couple months along into listening to the Tannoys –(the ‘s&t’ blog lags behind real time by anywhere from a couple weeks to a couple months)-- I really like them, and have to say they’ve been one of the easiest ‘vintage’ items to incorporate into a modern system. Fact is, I suppose, they’re not like the 1955 garrard 301 I use, or really old tube amps or tuners or something—the Monitor Gold design is from the late-60s, legitimately the modern era, and the actual drivers I have date from about ’71, so, not such museum pieces, really. Bolt down into cabinets and connect the cables, and you start to get the picture immediately.
I am really pleased to have gone down the Tannoy-Alnico route, they absolutely reward low-watt-large-transformer tube-amp sources without a glitch or regret. But I’m using a kt-88 ultralinear amp, whose circuit puts out a really muscular 8 watts; if it was a 2a3 or 45 amp, I think something like the French PhyHp drivers would be much more to the point.
But that’s the deal, I guess, putting together a system that works within it’s own limitations and doesn’t ‘disagree with itself’ .. internally. The idea of matched gear producing a coherent sound without much added or deleted along the way.
As to my enclosures, I’d give them a C- for execution (since I’m no cabinetmaker), an A- for inspiration (since I think the potential is all there, just not in this first rendition), and a B for sound, which is full, warm, articulate, substantial, weighty, but isn’t 1oo% served by the enclosures, which could do with a bit of rigorous testing / re-bracing per tests, that kind of thing .....
Occasionally I hear something that seems a bit like a resonance mode being reinforced by the structures. Most people wouldn't hear anything, but I do since the Tannoys are being inserted into an already very familiar system context, in the same space, with the same program material, lp or cd. Simple in-room testing procedures could advance things a lot; but I don't want to right now.
It actually comes to the conflict between creativity and science (and budget, of course)--- I’d rather just build a Version 2.0 before investing in whatever (software, microphone, etc) testing gear that would serve to verify my work or offer corrections to adjust the direction. Obviously, I should do both, testing and building, side-by-side for the Version 2.0.
For now though, summertime, and the listening is easy.
1:57 pm pdt
Wednesday, June 30, 2010 Second Coat
At the right, a test of the
mortise joint for the levelling bases. Above, another varnish coat,
some enhanced veneer plying on the front baffles, and next, a
long-delayed listen.
Report upcoming.
2:42 pm pdt
Monday, May 3, 2010 Drying And Damping
Almost five days now since
the varnish fest here, and even though the surfaces feel hard,
they're still airing out and can be noticeably aromatic in a closed
room. So I'm giving them another couple days for the first
buff-down that will precede the second coat.
With no action on that I've
been working on how to use plane, bar-clamps, and an improvised
bench to square up the two-by-fours for the stands. That's coming
along, and I'm seeing that the height of these stands will still
be about six inches or so shy of Tweeters At Ear-level. What they
will be, though, is a substantial enough foundation to build on,
later, once more nice lumber appears for the height extension.
Aesthetically, gracefully proportioned low-profile stands are the
desirable look; adding extensions will never be as nicely low-key,
and so we'll just have slightly low tweeter position for a start.
They will, of course, be able to be tipped back to compensate via
the levelling spikes.
I've decided that the
Cookie Torsion Box back panel is a project best left to the future;
for now I've cut and fitted quarter-inch ply sheets to the back of
the wine-crate structure. Perhaps a layer of felt will be included
in-between to make the panels deader sounding, too. The Cookie idea
is still viable, and can just build outward from the ply backs I've
got now. These need to be listened to again-- I haven't heard them
since they were single-wall crates --- before any more hundreds of
hours of work goes into them.
But
I won't be tossing the cookies.
Having time to think while
the varnish dries is allowing me to have increasing doubts about
whether it was right to leave the center spaces open in the grid
area of the speaker wall construction. I keep thinking I really
should have put damping material in there-- if not sand or lead,
then just something to take the 'hollow' out of the equation. Even
corrugated cardboard inserts, contact-cemented into place, would
have surely damped those open spaces somewhat. But the whole
fitting, clamping & gluing extravaganza would have been much more
complicated with trying to add that step, and the potential for
getting something a bit lumpy would have been annoying. Ah well,
can't do anything now, those numerous spaces are glued strongly and
now varnished for eternity. Give or take a lifetime or so.
4:11 pm pdt
Thursday, April 29, 2010 Varnish !
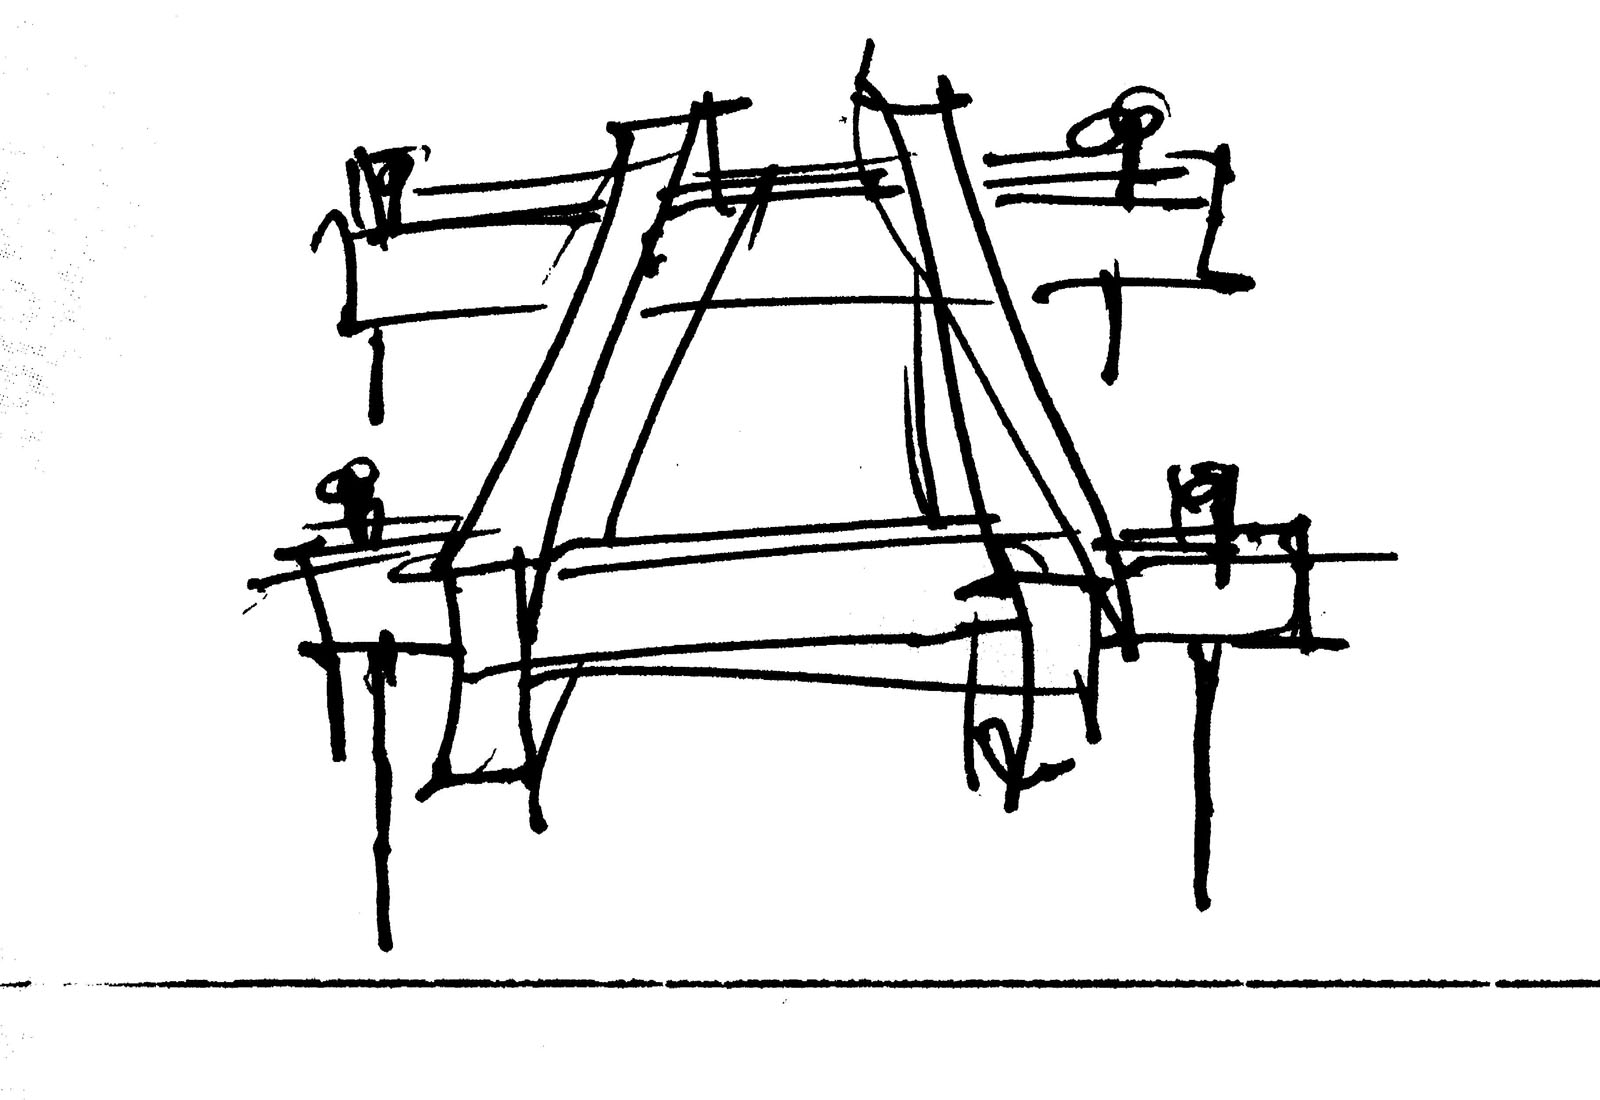
1:57 pm pdt Thursday, April 22, 2010 Tic Tack Toe
High winds and rain
limiting finish & fit operations around here, so, thinking ahead a
little toward the eventual height on speaker supports-- and what
kind of supports or stands will get there.
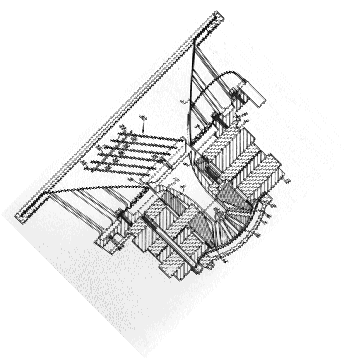
I've settled on a large
pair of front-to-back 2x4s that have a crossmember of a
narrower hardwood that intersects them side-to-side. I think I'm at
the point with chisels and block-plane that I can actually do a
flush mortise joint between the two, where the hardwood actually
passes directly thru the upended pine two-by-four. Looking down on
the supports, they should look like a "#" shape, more or less. It's
becoming clear that a few scans of sketches and diagrams are going
to help here; I'll try and get that posted this week.
At any rate, the hardwood
(side-to-side) beams will extend beyond the dimensions of the
speaker cabs on the sides by a few inches, and be terminated there
with tall threaded levelling spikes. After pricing various audio
spike hardware, even generic cheap ones aren't very cheap at all. A
regular trick to avoid the Audio-Price penalty is to use
masonry fasteners from Ramset or other source, which are
conveniently point-tipped on one end and threaded on the other...
But these aren't quite tall enough to qualify for
clearing the almost two inches of hardwood (and extending well
beyond that to spike) that they'd have to encompass in my plan.
So in the true S&T spirit,
let's make some spikes out of commonly available materials. A good
hardware store will have a broad stock of "threaded rod" in
many materials and dimensions. Since oxidation wouldn't be a plus
here, I decided to look at stainless steel or maybe brass as
the bolt portion of the levelling spike. Stainless is an impressive
material that works very well, but I've filed stainless bolts before
and each one takes hours. In going with the earlier brass-hardware
approach on the MG drivers themselves, I think brass will be fine if
it's thick enough. It appears that 1/4" brass threaded rod will
be strong and rigid enough to position on all four 'outrigger'
hardwood footer extensions. Above and below, the rod will be
locked in position with brass washers & hexnuts. The resulting
spikes will be four inches tall with very small points at the base.
Assuming that I can bore squarely perpendicular holes in the
hardwood --no guarantee of that-- this simple system should
properly anchor and level the "#" shaped rig of 2x4 and hardwood
crosspieces, and the speakers themselves. For now, cutting and
sharpening tips of brass threaded rod is something of an excercise
in watching a limited attention span evaporate every few minutes.
But results should be worth it.
1:36 pm pdt Monday, April 19, 2010 Guiding Light
The guiding light and
constant reference in this little project has been the thorough and
patient voice of Mr. Gilbert A. Briggs, of Rank-Wharfedale Ltd,
author of numerous speaker & enclosure guidebooks, and godfather to
a million independent hi-fi adventures. Briggs founded Wharfedale
in 1932 and his little books make good sense even in the next
century. One of the
many innovations at Wharfedale under Briggs was the design of
double-wall loudspeakers, something related to the project here, but
in that case with the internal gaps filled with sand for
damping. Here we're opting for broad & blocky gridwork to damp the
panels without the weight of something like sand, but the approaches
aren't so far apart. Damping materials like soft polymeric foam or
felt were considered, but they weren't immediately available so
weren't included. Next time.
11:03 pm pdt Saturday, April 17, 2010 Trying To See The Finish Line
Coming along, veneer ply
skin is attaching beautifully to planed grid, glue is being poured
with abandon. The most exasperatingly time-consuming part is
attaching the pre-finished edge trim, which is taking
dog-years to size, sand and fit. I've used a tinted varnish
concoction to make it work better with the color of the veneer-ply,
but it's taking forever.
Considering a "cookie"
treatment for the backs of the cabs. I still have maybe five dozen
cut-out cookies from the mass relief work I did on the crates
originally. Thinking that perhaps they might be doubled up to
extend the cabinets in the back. A double-height cookie torsion box
in back would add a counter-balance to the front-forward weight of
the drivers, too.
That approach, whether
doubled or not, adds an intriguing possibility : what if I perfed
the back of the existing box before adding the cookies + new back ?
It would add a few liters in internal volume, and wouldn't sacrifice
much in the way of structural integrity ...
This will take some
tinkering on the drawing pad. For now, it's fitting & gluing sticks
for cosmetic trim.
12:39 pm pdt Monday, April 5, 2010 Grids Attached
Poplar slats adhered in
grid pattern; the veneer-ply will overlay this to form a
semi-torsion-box arrangement. Top sections covered in "cookies"
from the mass-relief cut-outs on the inside..... There will be
half-inch-square pine edging laid in along all right angles,
as borders for the t-box, and as cover for the scrappy woodwork
within.
6:13 pm pdt Sunday, April 4, 2010 Oceans Of Glue, Buckets Of Bordeaux
Using the standard
carpenter's yellow woodglue throughout this effort, and using a lot
of it. Glue is even cheaper than drywall screws, and I'm lavishing
gallons on the now-joined crate constructions; I can't see leaving
any joint or braced junction unfilled, and since what we see here
will get covered anyway, why not ? I'm not really depending on it
for structural strength, but it does close gaps and provide a tough
plastic grip on brackets & bracework.
I'm noticing that the glue
is much happier taking on a just-planed surface, clean but rough,
than any more finished surface. Working now on the exterior walls
and attaching slats of Poplar in a grid pattern that will form the
substructure for the outer veneer-ply skin. And provide the
honeycomb part of the torsion box effect.
Maybe now is a good time
--before they vanish forever under the veneer-ply and edging-- to
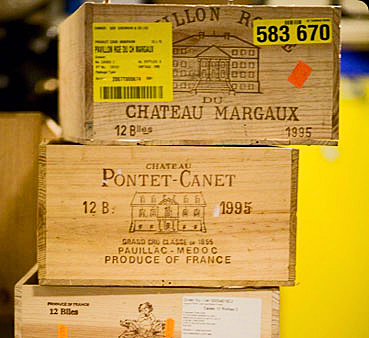
mention that we here at Sound & Torsion recommend St. Emilion
and Margaux winecrates due to their classical,
"bordeaux-box" dimensions, stout construction and relative
uniformity. Emphasis on the relative.
1:05 pm pdt
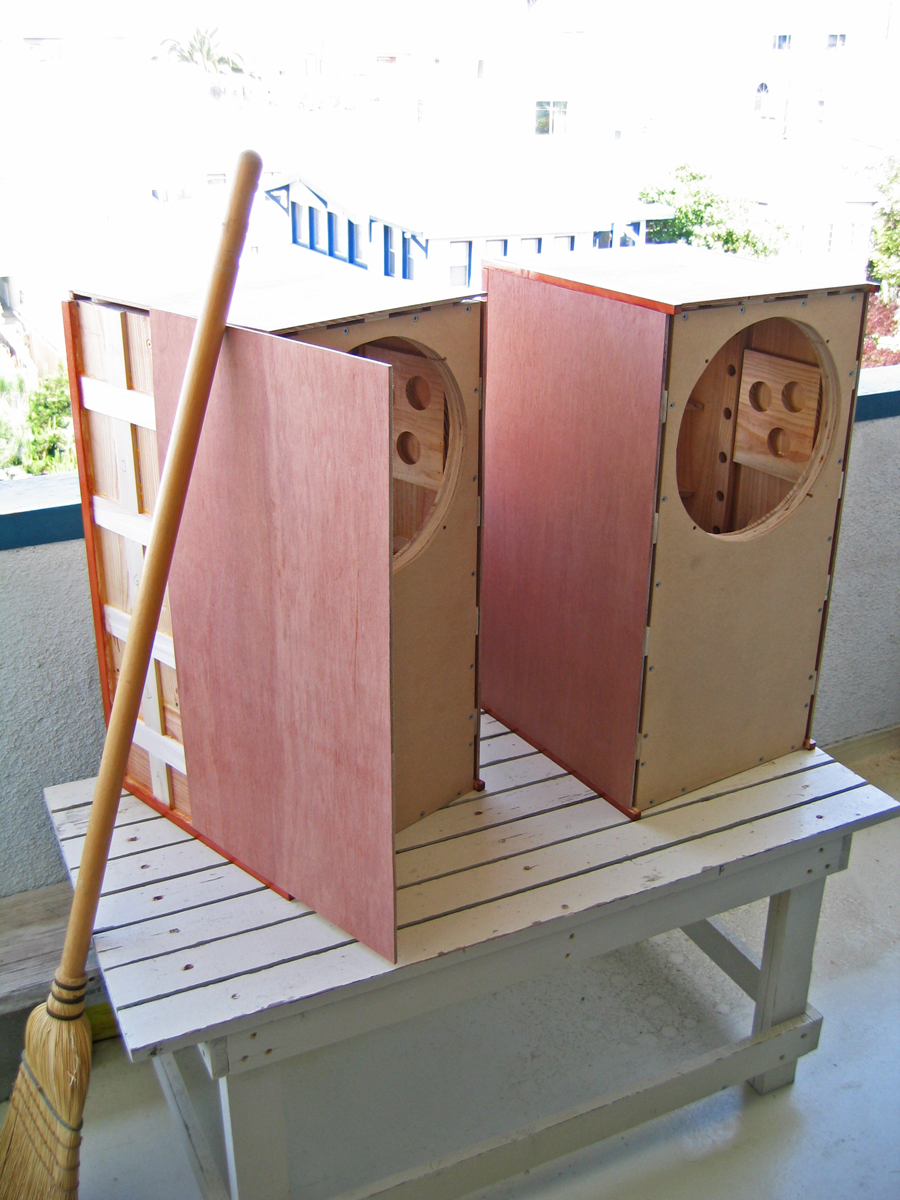
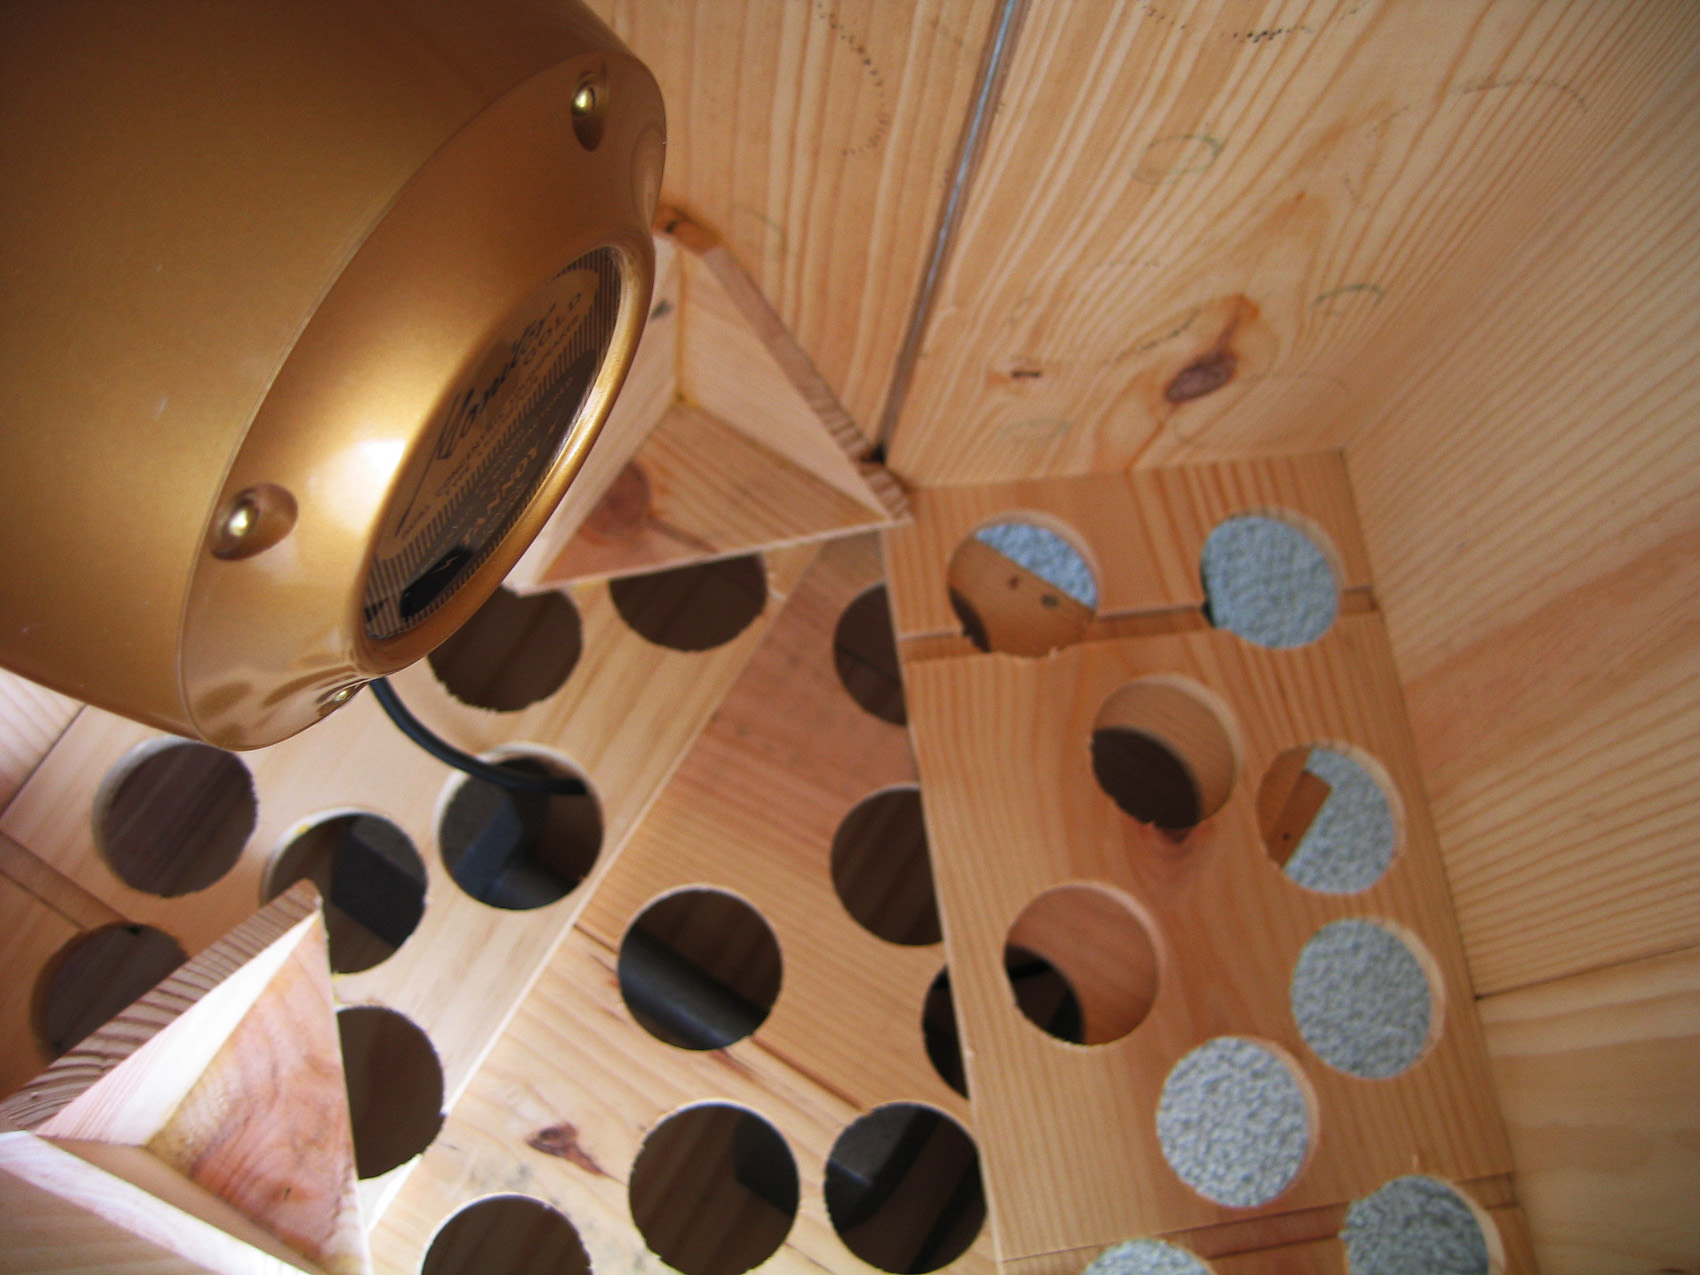
Sunday, March 28, 2010 Swiss Cheese In A Parallel Universe
Moving along in fits and
starts. The winecrates are finally screwed & glued together, never
to be cracked open again. I had to remember to add a little doorway
in the back panel so as to access the interior side of the driver
fixing bolts. Cabinets are now more rigid with this step, as would
be expected. There's more 'thud' and less 'boing' when the walls
are tapped.
Decided to try a kind of
outer-shell reinforcement along the sides and tops of the
enclosures, comprised of a spacer / grid material on the outsides of
the winecrates and a veneered ply skin. See the discussion of
'torsion box' elsewhere for more on this.
During the various bracing
manouevers I cut numerous rounds out of the winecrate wood as Mass
Relief. As they collected-- probably over a hundred-- in a shopping
bag I wondered what they might be used for. Well, why not as the
grid-spacer material between winecrate & veneer-ply. Trying this
out is a bit time-consuming, since all the discs of crate-wood in
question need to be carefully cleaned up and sanded flat so as to
provide a uniform, planar spacer in between materials.
Once the discs are adhered
to the exterior of the enclosures and the veneer-ply adhered to the
bed of discs --- think opposite-of-Swiss-Cheese -- then square
strips of dark-stained trim or beading will cover all
edges. Multiple coats of tinted varnish will hopefully draw
everything together. This could look reasonably nice or really
amateur; the approach is to keep covering previous tracks
with acceptably smooth & unobtrusive surfaces. The 'enclosed
honeycomb' effect of the lamination should make for lightweight but
damped walls that aren't reverberating (as much as any single-wall
structure) or storing energy. We will see.
9:35 pm pst Friday, March 19, 2010 Auditor's Report
For those keeping track of
budget, the only cash outlay so far has gone to some woodscrews,
brass fastening bolts for the drivers, and glue, lots & lots of
glue. That's it. All materials free, found, or donated by
winesellers.
3:10 pm pst
Grille Covers.
Need 'em, can't quite decide how to fabricate them. Little
word-joke there.
Box Up The Crossovers.
Now that we've got halfway reasonable enclosures going, I think it's
time to treat the crossovers to little boxes of their own. Just for
looks, really, and to add weight so they don't get pushed around.
Eventually they'll get sets of binding-posts mounted up, so I can
use the real speaker cable; for now the thinnish tannoy stuff is
fine.
Capacitors. These
(electrolytics, 16uf) would have already been ordered, if they
weren't such an impossible-to-find rating. There are fifteens,
twenties, and twenty-twos out there by the millions, but not
sixteens. Still researching there. Hard to imagine it will end up
taking three or four paralleled caps to add up to sixteen.
Lead Shot. Got
it, in a storage space, just need to pick it up. For now there is a
ten-pound steel weight in the base of each cab. The lead will eat
slightly less volume and do the same job.
Spikes. Not yet;
for now I've got bars of hardwood along the front and rear,
underneath the enclosures, with the front ones on edge for a litte
up-tilt, and they seem right for the time being.
Those Treble
Controllers. Really ugly but I can't see wiring them out of
the system yet, until I've got real cabinets .... or until these get
some hardwood outer shells ... They really are useful, though, in
getting a feel for what is going on, at least in the treble driver
halves of the dual-concentrics. As such they'll be another layer of
extraneous electron run-around, that I can't eliminate quite yet.
If I were to hard-wire today, though, I think I'd keep Rolloff at
flat and Energy one notch to the minus.
Just now listening to
Julian Bream's Nocturnal, a moody collection of modern
(Britten, Frank Martin, Toru Takemitsu) pieces with the amp switched
to triode. At a full five watts per channel ... for
small-scale classical guitar suites, no more is necessary, I think.
2:52 pm pst Wednesday, March 17, 2010 Fork In The Road
Moving along with the
wine-crate cabinetry.
I had the idea that now
that I've heard what I need to know about basics and functionality,
that I might save some labor and just pick up some used speaker cabs
locally.... there are no shortage of old American classic cabs
roaming around the L.A. area, and finding something in the Jbl or
Klipsch vein isn't too difficult. The problem is that most of
those, once you get to usable sizes for a 12" MG, look pretty
bluntly unpleasant, a little too-reminiscent of giant solidstate
amps driving mega-driver arrays playing "Don't Fear The Reaper" or
similar. Anything that starts looking a little elegant, remotely
stylish-- seems to attract an entirely different market, and
pricing approach, which undermines the nickel-&-dime philosophy
here, as well as the budget. So for now, gleaming walnut vintage
enclosures are out, winecrate modification is back in, in a big way.
To which end I've added
thicker front baffle panels, comprised of nice 3/4" ply that I'd
tucked away years ago, and a top layer of 3/16" hdf .. because the
sheets of hdf were a find. So a layered baffle, easily the most
rigid thing about the whole construction thus far. It's fairly
certain that the crate/ply/hdf laminate --unglued for now and
reversible- will be a less-resonant launching-board for sound, and
I'm hoping the fairly-dead hdf surface keeps out any tendency to
'beam'. We'll see.
I'm putting all that back
together, maybe adding a brace here or there internally, and looking
forward to another listen. Having the tannoys on really rigid
baffle support should be completely different, if nothing else, to
having them installed in the forward-facing base panels of the
crates by themselves in the 'make-shift' version. For now, here's a
photo of the interior.....
9:40 am pst Tuesday, March 9, 2010 The Substance Is There Reminds me a bit, in casual listening, of the classic old three-way Spendors I lived with in an East Village sublet of 1985 or so. Just the weight, the timbral accuacy and the effortlessness...
The substance is
there, the foundation, and no problem at all, so one can only
imagine the eventual refinements.....
10:31 pm pst
When you get your hands on
the MGs it's worth taking every precaution to preserve that paper
flared-cone no matter what else you do. So while smashing up wine
crates, for example, it's sensible to have the drivers away from the
melee, preferably on a high shelf somewhere, face down & protected.
My first chore was to get some mounting hardware, so on the idea
that brass would be less hardened and non-magnetic, I found some
10/24 brass inch-long bolts that would suit the job; while having a
later look at the backs of the drivers, I found that Tannoy
themselves had used brass hardware, so a good omen.
Two other chores were
electrical : after the first evening of "trying not to change
anything at first", I felt that there was some connection dirt in
the system somewhere. So first, a session with spray contact
cleaner on the four-pin plugs, and a caution on the same process for
the jack. The four-pin jack on the speaker chassis is completely
open in the back to the paper cone-- so by all means slip something
protective like soft paper or cloth behind the jack before having at
it with the contact cleaner. No reason to think that
contact-cleaning agent sprinkled on the back of the speaker cones
would be a positive thing, so watch out for the internal wires, and
slide a soft shield back there while you whisk away at the
conductors of the jack. Make no mistake, though, signal transfer
benefits from contact-cleaning forty-year old sliding connector
parts.
The other electrical chore
was that terminal strip at the amplifier end of the crossover
cabling. Did I really need to be connecting my speaker cable to
the terminal strip, so that in turn it could then connect to the
Tannoy speaker cable entering the crossover ? No, my amp is within
three feet of each speaker, and with crossovers laid out, the Tannoy
cabling makes it easily. So unsolder the terminal strip, keep
additional speaker cable coiled up elsewhere. A few less
connections and cable lengths, here at the
beginning of understanding the crossover, energy and rolloff
controls -- removes a bit of unwanted haze. Simple, reversible.
Also, not sure that one
wants to ultimately enshrine Tannoy's thin seventies speaker-wire
itself in any finalized Monitor Gold setup, but it's a captive
fitting for the moment, so it's taking the place of any more
audiophile cabling for now.
My makeshift crate-cabs are
getting more and more solid by the day, with new braces and
crosspieces added, suitably mass-relieved, nearly every day. I
imagine that the MakeShifts will have subsumed about eight or nine
wine-crates by the time they are retired, which may be soon. They
are constructed of about 2.6 crates each, and the remaining crate
materials have gone to bracing. Photos forthcoming.
11:13 am pst Saturday, March 6, 2010 Arrived : Two Reasonably Well-Behaved Rabbits
Arrived thursday, and there
has been wine-crate sawdust, debris and splintered boxwood all over
for days now. Just needed something to check that the Monitor
Golds are operating, so, quickie boxes comprised of about 69 liters
worth of volume, inadequate even by minimum standards. But enough
to check that there aren't gremlins lurking around the rabbit
hutch.
We have signal, and both
elements of dual concentricity are feeling it.
Whoo, bass, too.
6:07 pm pst
Sunday, February 28, 2010 Top Hat, Drum Roll ... Rabbit ?
Got them. I think.
Paper-accordion surround Golds. Shipping tomorrow.
Delivery this week.
A year and a half in the
planning; we'll see what persistence amounts to in the face of the
luck of the draw. Rabbit's feet out & ready for action.
8:36 pm pst Monday, February 22, 2010 Before The Flood
This little journal starts
before I've got my hands on the pair of Tannoys I'm buying over the
internet. Thus far it is narrowed down to the area of 12-inch
Monitor Reds, the expensive classics, or Monitor Golds with
paper-accordion surround, the runner-up. The attractively compact
10-inch IIILz type I've ruled out on the basis that they're reported
to be a shade less-rich than the 12-inch, though pacey & accurate;
the fifteen-inch ones aren't matched to the small to medium space
they're likely to end up occupying in the next decade or so.
And so as the search comes
down to the final hours the pressure is on to design cabinets that
will serve as competent first-efforts, something to give a minimum
idea of what the very-expensive drivers can do. And yes, it
involves wine-crates, the most minimal box that will suit the
requirements. With modifications, of course.
2:47 pm pst Friday, February 19, 2010 Light Bulb
No more the puppet of
the malevolent audio manufacturers.
This idea came to light
over about a year and a half of guesswork & perplexity.
Simply put, really
spectacular drivers, in boxes of increasing sophistication.
Starting, modestly
enough, with wine crates as building blocks.
2:31 pm pst
© James Donahue 2011
Hosted by the Tannoy Monitor Gold Website © |
Tannoy
loudspeaker project
Music, twentieth century
analog audio, and
engineering-or-something-like-it.
An amateur exploration of
the mysteries
of signal and noise,
all on a nickel & dime
budget.
|
 Welcome